


Important
Before I say anything else here, DO NOT SKIP THE STRIP PIECING SECTION OF THE PATTERN. Even if you do not plan to strip piece your quilt, there is crucial info in this section about the width that you will cut your fabric. The instructions and help I give during the QAL will be for strip piecing - if you prefer not to strip piece, you are on your own for that portion of the pattern.Video Chat
Last week we did a video chat. It was a lot of fun and I want to do it again - this week we will be meeting on Thursday at 1pm PST. This seems to be a time that works pretty well for most people. If you have another time you prefer, please let me know in the comments and I will do my best to switch up the times another week to try to accommodate you.Facebook Messenger Rooms was a little buggy, so this week we are going to use Google Meet. Here is the link: https://meet.google.com/gkt-yrqp-mto

Supplies
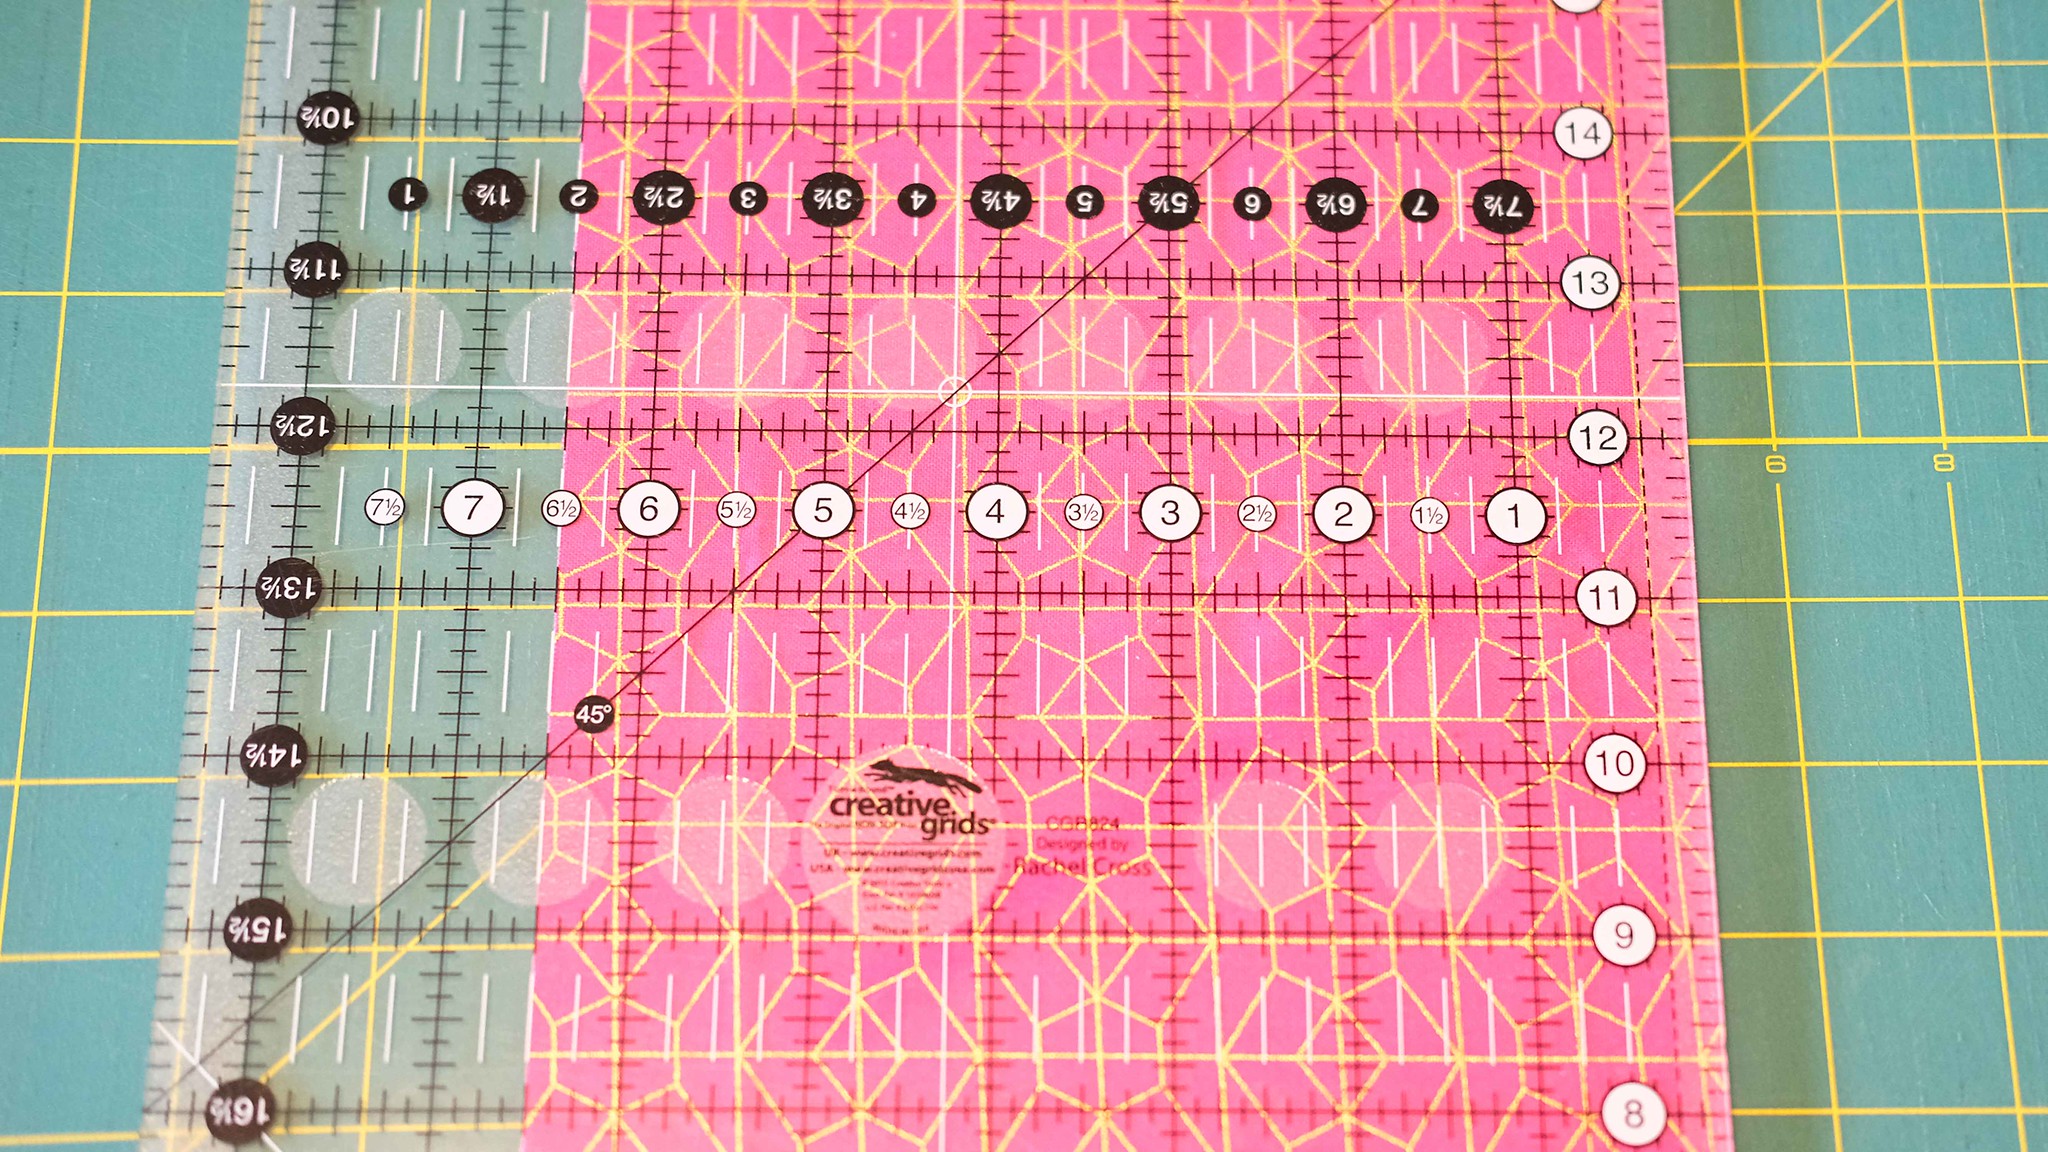
You do not need anything special to cut fabric for your quilt. I am going to show you how to cut your strips using a regular ruler (I use this one) and I will also talk about using a striplogy ruler. I have a Striplogy ruler and it does help make the cutting step go faster on quilts like this, but it is not required. I have the regular version of the ruler, but if you decide to invest in one, get the XL.Cutting Your Strips
In the "Strip Piecing" section of the pattern, there is a table that tells you the number of WOF strips to cut. WOF = Width of Fabric.When I cut WOF strips, I keep my fabric folded with the selvages together and then I fold it in half again (there is more info about this in the videos at the bottom of the post). This way, I have a shorter distance to cut which means that my ruler is less likely to slip while cutting. You are only cutting through 4 layers of fabric when you do this so your rotary cutter should be able to handle it - if your rotary cutter can't handle 4 layers, it is time to for a new blade.
I prefer to do all of my cutting at once - it is my least favorite step in the process and I like to get it over with. If you are still working on fabric placement or you just love cutting fabric and want it to last as long as possible, you can do this however you would like.
Using Fat Quarters - You can skip this section if you are not using fat quarters
If you are using fat quarters instead of quarter or half yards here, you will need to cut twice as many strips for MOST of the fabrics. Using fat quarters is actually a little more efficient for some of the fabrics for the baby size a for a couple of the fabrics for the lap size. If the table lists 4 strips, you will need 2 fat quarters for the fabric (or 1/2 yard like listed in the pattern).I did not include the twin size in this table because you would need 2 identical fat quarters for almost all of the fabrics and it is actually less efficient to cut your fabric from fat quarters for that quilt size.
I am going to list the number of WOF strips for using fat quarters below - this only applies for Fat Quarters so WOF in this case means the width of the fat quarter. Normally I would say that for a FQ, WOF=21", but if the table says you need to cut 3 strips, you will need WOF to be 18" (you will cut your strips sideways).


If you are using fat quarters, you will need to cut your Fabric O strips in half before strip piecing.
Cutting the WOF Strips
The remaining information about cutting your strips is in the videos below. If you have any further questions, please ask them in the comments section or ask them during the video chat on Thursday.A couple of things to note:
- I do not remove my selvages before cutting - I will trim them off later after strip piecing.
- It is always a good rule to double check your measurements before cutting. When I made this quilt a couple of weeks ago, I cut one of my strips 1/4" too small and it caused a whole bunch of problems.
- Your fabric will be cut more accurately if you have a fresh-ish blade on your rotary cutter.
Here is a little more info about cutting your Fabric O strips:
There will be two more posts this week, one for strip piecing and one for the next step in the cutting process, so stay tuned!
If you are just joining in with the Quilt Along, you can find the pattern here:

Which is the "O" fabric? I can't aee it in any of the diagrams, so I'm not sure if it's supposed to be part of the sashing or border or what; therefore, I don't know if to pick a solid or a print. Please help!
ReplyDeleteThe O print is the thin sashing!
DeleteYour method of evening up the raw edge after you cut your first strip is genius! I was taught to even up that edge before cutting strips and, of course, it is on the wrong side for me to cut it with my best hand. Enough said. Fabulous tip!!! Thank you!
ReplyDeleteI'm glad it helps! I don't know if it is technically the correct way to do it, but that method has served me well!
Delete